
30DaysMSGraph – Day 12 – Authentication and authorization scenarios
List of all posts in the #30DaysMSGraph Series
Today’s post written by Jason Johnston
In Day 11 we discussed Access Tokens which are crucial to make Microsoft Graph requests. Today we’ll look at the various authentication scenarios that are possible when querying with Microsoft Graph.

OAuth 2.0 flows
Azure AD implements several auth scenarios as defined by the OAuth 2.0 specification. Let’s take a look at each one.
Authorization code grant
The authorization code grant flow is probably the most commonly-used flow for obtaining access tokens. This flow is separated into two distinct parts: the authentication/authorization part, and the token request.
First, the user is sent to the Azure Active Directory (Azure AD) login page. In a web app, this is a simple redirect to the site. In a native application, this involves opening up a browser dialog to the Azure AD site. The URL contains parameters that identify the application making the request and the requested permissions scopes. If this is the first time the user has used the application (or if the requested permissions have changed since the last time the user used the application), a list of the requested permissions are presented to the user, giving them a chance to review and approve or deny the permissions.
If the user approves the requested permissions, the browser redirects back to the application with an authorization code. The app can then send a POST request with that authorization code and the application’s secret to the Azure AD token endpoint to get an access token.
Types of permissions
Apps that use this flow make use of delegated permissions. The access tokens returned from this flow always have a user context.
When to use authorization code grant
This flow is the best choice for your app if your app:
- Is a server-side web application or native/mobile application that allows user interaction
- Needs to access the Microsoft Graph as the user
Implicit grant
The implicit grant flow starts the same way as the authorization code grant flow, by redirecting the user to the Azure AD login page. However, in this flow, instead of returning an authorization code once the user authenticates and authorizes the app, the access token is returned.
This abbreviated flow exists to support single-page apps (SPA) implemented in JavaScript. Because these applications run entirely within the user’s browser and may not have a backend component, there are a number of challenges in doing an authorization code grant flow:
- Storing an application secret so that it is not discoverable is not feasible in client-side JavaScript code
- Most auth servers (Azure AD included) do not support CORS requests
This flow addresses those issues by eliminating the application secret and not involving a POST request.
Types of permissions
Apps that use this flow make use of delegated permissions. The access tokens returned from this flow always have a user context.
When to use implicit grant
This flow is the best choice for your app if your app:
- Is a client-side JavaScript single-page app with no backend components.
Client credentials grant flow
The client credentials grant flow is different from the previous two flows in two major ways. First, the flow does not require any user interaction, so it’s the best choice for a service or daemon application. Second, this flow makes use of application permissions, rather than delegated permissions.
While the flow itself requires no user interaction, there is a requirement that an organization administrator provides consent to the permissions required by the app. This is a one-time process that can happen either during app registration, or you can build a minimal web app to allow the administrator to authenticate and authorize the application.
Once an administrator has authorized the application, the app can silently request tokens by providing its application ID and secret or by signing the token request with a certificate shared with Azure AD during app registration.
Types of permissions
Apps that use this flow make use of application permissions. The access tokens returned from this flow do not have a user context and grant access to all users within the organization.
When to use client credentials grant
This flow is the best choice for your app if your app:
- Requires access to all users in an organization
- Does not implement UI or runs in a way that user interaction is impossible (unattended daemon apps, services, scheduled tasks, etc.)
On-behalf-of flow
The on-behalf-of flow is used in a middle-tier service scenario. It typically involves a user application that uses the authorization code grant or implicit flow, and a Web API or service that is protected by Azure AD OAuth that accesses the Microsoft Graph.
In this flow, the user logs into the front-end application, which obtains an access token granting access to the middle-tier service. The middle tier service then uses that token to obtain another token on the user’s behalf to access the Microsoft Graph.
This flow differs from a normal authorization code grant flow because the front-end application itself has no access to the Microsoft Graph.
Types of permissions
Apps that use this flow make use of delegated permissions. The access tokens returned from this flow always have a user context.
When to use on-behalf-of
This flow is the best choice for your app if your app:
- Involves multiple components, including a front-end user application and a back-end web API or service protected by Azure AD OAuth
Refresh token flow
Access tokens issued by Azure AD are short-lived, expiring after an hour. Applications can request new tokens without requiring the user to re-authenticate as long as the user has not revoked the application’s authorization. The method to do this depends on the flow used by the application.
- Apps that use the authorization code grant flow or the on-behalf-of flow can request the offline_access scope to receive a refresh token along with the access token. The app makes a POST request to Azure AD’s token endpoint with that refresh token to obtain a new access token.
- Apps that use the implicit code grant do not get a refresh token. However, as long as the app is running in the user’s browser and the session is maintained, apps can request a new token silently by using a hidden iframe.
- Apps that use the client credential code grant also do not get a refresh token. Since token requests in this flow do not require user interaction, the app simply requests a new token using the same POST request it used to obtain the initial token.
Try it out
You can try the authorization code grant flow out using your browser and Postman. If you are not familiar with Postman or similar REST endpoint development tools feel free to revisit these exercises after you’ve gone through tomorrow’s post for Day 13.
- Register an Azure AD V2 app following the directions from Day 9.
-
Ensure that the redirect URI is ‘https://localhost:8080’ to match the below steps.
-
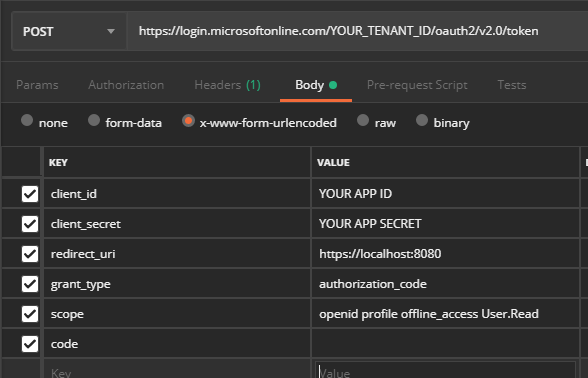
- Open Postman and create a new POST request to https://login.microsoftonline.com/YOUR_TENANT_ID/oauth2/v2.0/token, replacing ‘YOUR_TENANT_ID’ with your tenant ID from your app registration.
- Configure the Body tab as follows:
- Choose ‘x-www-form-urlencoded’
- Add a ‘client_id’ key and put your application ID from your app registration in the value
- Add a ‘client_secret’ key and put your application secret from your app registration in the value
- Add a ‘redirect_uri’ key and put ‘https://localhost:8080’ in the value
- Add a ‘grant_type’ key and put ‘authorization_code’ in the value.
- Add a ‘scope’ key and put ‘openid profile offline_access User.Read’ in the value.
- Add a ‘code’ key and leave the value blank.

- Open your browser and go to https://login.microsoftonline.com/YOUR_TENANT_ID/oauth2/v2.0/authorize?client_id=YOUR_APP_ID&response_type=code&redirect_uri=https%3A%2F%2Flocalhost%3A8080&response_mode=query&scope=openid%20profile%20offline_access%20User.Read, replacing ‘YOUR_TENANT_ID’ with your tenant ID and ‘YOUR_APP_ID’ with your application ID from your app registration.
- Login and authorize the app. Your browser redirects back to https://localhost:8080 and should show an error that the site cannot be reached.
- Copy the URL in the address bar of your browser and paste it into Notepad. It should look like https://localhost:8080/?code=IAQABAAIAAAC…&session_state=…. Copy all of the characters after code= and before &session_state. This is the authorization code returned by Azure AD.
- Paste the authorization code into the ‘code’ key in Postman, then send the request.
- The response contains a JSON payload with the access token, refresh token, and ID token.

Join us tomorrow as we make calls to Microsoft Graph from a REST endpoint development tool such as Postman in Day 13.
 Light
Light Dark
Dark