
How to build a Blazor web app with Azure Active Directory authentication and Microsoft Graph
If you’re a .NET developer, then it’s quite likely that you’ve heard how Blazor is one of the hottest technologies these days. Blazor is a framework for building interactive client-side web UI with .NET. Blazor Server, the one that we will focus on this blog post, provides support for hosting Razor components on the server in an ASP.NET Core app. UI updates are handled over a SignalR connection. And since most applications require some form of authentication and authorization, what better way to show you how to implement authentication with Azure AD and how to retrieve data from Microsoft Graph.
Prerequisites
To follow along you’ll need to have the latest version of the .NET Core 3.1 SDK, Visual Studio 2019 (optional but a great choice) and an Azure AD tenant. If you don’t have access to an Azure AD tenant, then you get one totally FREE by either registering to the Microsoft 365 Developer program or by creating a Free Azure Trial account
Blazor and authentication
If you’re building Blazor (server-side) apps, then we have some great news. The Visual Studio and CLI templates support authentication out of the box. Open Visual Studio and create a new Blazor app. We will name it “BlazorAppWithAuth” and follow the rest of the instructions below.

By selecting the Work or School Accounts authentication option, Visual Studio created the appropriate app registration in Azure AD and configured our Blazor app with the necessary settings and code in order for authentication to work out of-the-box. We can confirm this by inspecting the appsettings.json.

And if we jump to our App Registrations tab in Azure AD in the Azure portal, we can see that there is an app registration that matches exactly what we see inside Visual Studio.
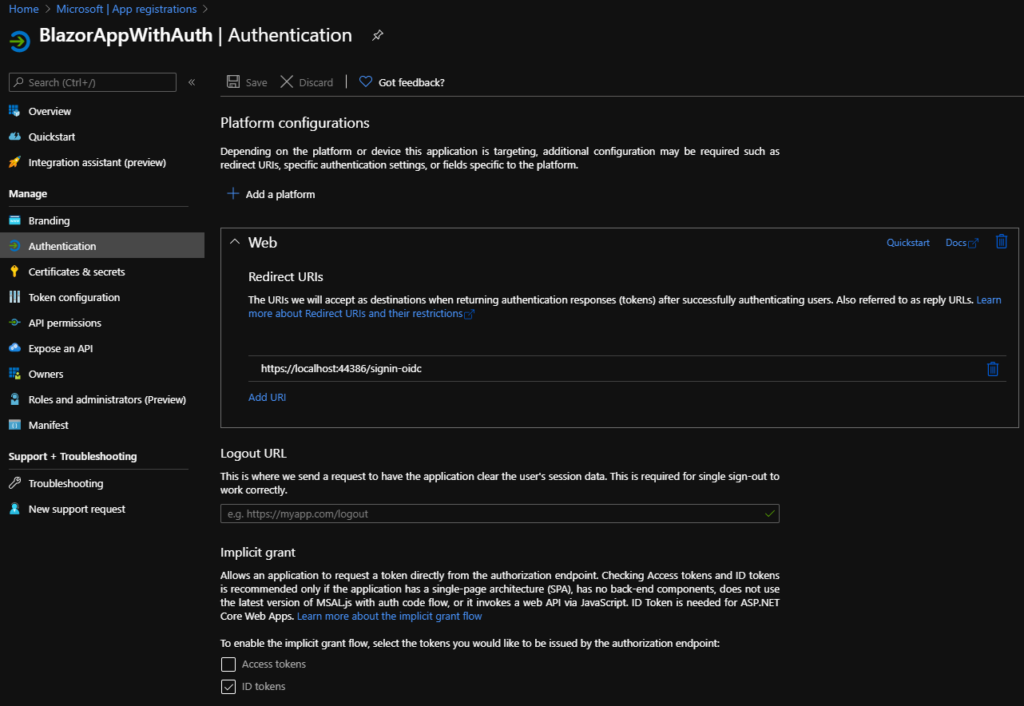
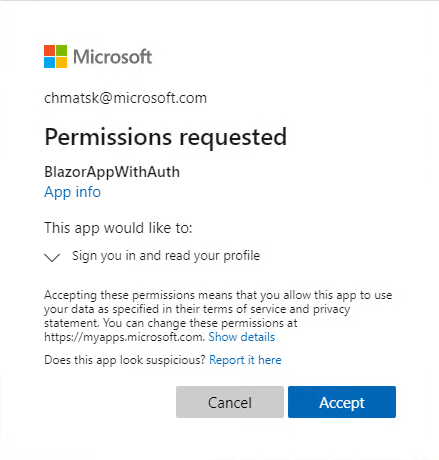
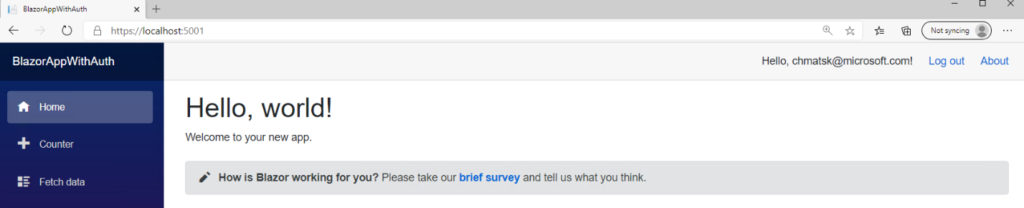
Without writing a single line of code, our Blazor app will prompt users for a login before accessing any page. We can quickly test this by launching the app in Visual Studio. The first time we access the site, we will also be prompted to consent to the (default) permissions required by the app (i.e to read the user’s profile)
At this point you may assume that our task is done, but there are a couple of gotchas. Firstly, the code that the default template is using is older and for this reason it also defaults to the v1 Azure AD endpoints. If you want to know why you should be using the Microsoft identity platform and the v2 endpoint, then be sure to review our Microsoft identity platform documentation.
Modernizing authentication with Microsoft.Identity.Web
At Build 2020 we announced a new authentication and token management library for ASP.NET Core 3.1 (and above) apps. The new library does a great job in abstracting a lot of the complexities and allowing developers to quickly implement authentication within a few lines of code. However, the biggest benefit is that since this library is built on top of MSAL, you don’t need two separate libraries to authenticate first and then acquire tokens for speaking to back-end APIs. So, let’s see what it takes to migrate to the latest library.
NOTE: Microsoft.Identity.Web is still in preview with the GA coming soon.
First, we need to download the new NuGet packages:
- Identity.Web (0.2.2 preview)
- Identity.Web.UI (0.2.2 preview)


Next, we need to do a couple small code changes to swap out the old authentication code and plug-in the new code.
Open startup.cs and replace the following code
services.AddAuthentication(AzureADDefaults.AuthenticationScheme)
                .AddAzureAD(options => Configuration.Bind("AzureAd", options));

            services.AddControllersWithViews(options =>
            {
                var policy = new AuthorizationPolicyBuilder()
                    .RequireAuthenticatedUser()
                    .Build();
                options.Filters.Add(new AuthorizeFilter(policy));
            });
With
services.AddMicrosoftWebAppAuthentication(Configuration);
services.AddControllersWithViews(options =>
{
   var policy = new AuthorizationPolicyBuilder()
                    .RequireAuthenticatedUser()
                    .Build();
                    options.Filters.Add(new AuthorizeFilter(policy));
                    }).AddMicrosoftIdentityUI();
Finally we need to ensure that our app can use the right v2 endpoints for signin and signout. Open the LoginDisplay.razor and update the code as per below:
<AuthorizeView>
    <Authorized>
        Hello, @context.User.Identity.Name!
        <a href="MicrosoftIdentity/Account/SignOut">Log out</a>
    </Authorized>
    <NotAuthorized>
        <a href="MicrosoftIdentity/Account/SignIn">Log in</a>
    </NotAuthorized>
</AuthorizeView>
You will notice that there are no dedicated pages for sign-in and sign out. Instead, they are built into the Microsoft.Identity.Web dll. So as long as we update the Area to be “MicrosoftIdentity”, no other change is needed.
When we launch the app from Visual Studio again, we get to experience the new login capabilities available in v2 such as passwordless and multi-factor authentication. What’s great is that these features are designed to work without any code changes; as long as an Azure AD admin has configured these settings, all users can benefit from strong security.

As you can see, with a couple of lines of code, we were able to leverage the Microsoft.Identity.Web library to authenticate against Azure AD.
Retrieving data from Microsoft Graph
Microsoft Graph offers a wide range of APIs to allow you to build rich and immersive apps with the data your users own. In the steps below, we are going to pull user’s emails and display them within the app. To achieve this, we first need to extend the app registration permissions in Azure AD to add access to the email data and then we need to add some code in our Blazor app to retrieve and display this data in one of our pages.
To the Azure AD portal!
Find the app registration and go to API Permissions. Select Add New Permission and then select Graph API. From there, we want to select Delegated Permissions and select the “Mail.Read” permission.
We also need to create a User Secret since our app will need a way to validate the token and retrieve the data without any user interaction. Within the same app registration, open the Certificates & Secrets tab and create a new secret that never expires as it’s shown below:
Make sure to copy the password as you can’t access it again once you navigate away from this tab/page. However, you can always recreate it as needed – it’s easy and free 😊
Back to our Blazor app, in Visual Studio, we first need to add the client secret in appsettings.json. Inside the AzureAD config section, we must add the following line:
“ClientSecret”: “<your secret>”
In the startup.cs class, we need to update our code to ensure that it fetches the appropriate token with the right permissions and stored it in a cache so that we can use it later in the app when we make the call to Microsoft Graph. We will also add HttpClient to our services pipeline to allow us to efficiently make HTTP calls to Microsoft Graph later:
services.AddMicrosoftWebAppAuthentication(Configuration)
                .AddMicrosoftWebAppCallsWebApi(Configuration, new string[] { "User.Read", "Mail.Read" })
                .AddInMemoryTokenCaches();


            services.AddHttpClient();
Next, we need to update the code in the FetchData.razor page to retrieve our email data instead of the default (random) weather details. The following code contains all we need to retrieve and populate the page with our email data.
@page "/fetchdata"

@inject IHttpClientFactory HttpClientFactory
@inject Microsoft.Identity.Web.ITokenAcquisition TokenAcquisitionService

<h1>Weather forecast</h1>

<p>This component demonstrates fetching data from a service.</p>

@if (messages == null)
{
    <p><em>Loading...</em></p>
}
else
{
    <h1>Hello @userDisplayName !!!!</h1>

    <table class="table">
        <thead>
            <tr>
                <th>Subject</th>
                <th>Sender</th>
                <th>Received Time</th>
            </tr>
        </thead>
        <tbody>
            @foreach (var mail in messages)
            {
                <tr>
                    <td>@mail.Subject</td>
                    <td>@mail.Sender</td>
                    <td>@mail.ReceivedTime</td>
                </tr>
            }
        </tbody>
    </table>
}
@code {

    private string userDisplayName;
    private List<MailMessage> messages = new List<MailMessage>();

    private HttpClient _httpClient;

    protected override async Task OnInitializedAsync()
    {
        _httpClient = HttpClientFactory.CreateClient();


        // get a token
        var token = await TokenAcquisitionService.GetAccessTokenForUserAsync(new string[] { "User.Read", "Mail.Read" });

        // make API call
        _httpClient.DefaultRequestHeaders.Authorization = new System.Net.Http.Headers.AuthenticationHeaderValue("Bearer", token);
        var dataRequest = await _httpClient.GetAsync("https://graph.microsoft.com/beta/me");

        if (dataRequest.IsSuccessStatusCode)
        {
            var userData = System.Text.Json.JsonDocument.Parse(await dataRequest.Content.ReadAsStreamAsync());
            userDisplayName = userData.RootElement.GetProperty("displayName").GetString();
        }


        var mailRequest = await _httpClient.GetAsync("https://graph.microsoft.com/beta/me/messages?$select=subject,receivedDateTime,sender&$top=10");


        if (mailRequest.IsSuccessStatusCode)
        {
            var mailData = System.Text.Json.JsonDocument.Parse(await mailRequest.Content.ReadAsStreamAsync());
            var messagesArray = mailData.RootElement.GetProperty("value").EnumerateArray();


            foreach (var m in messagesArray)
            {
                var message = new MailMessage();
                message.Subject = m.GetProperty("subject").GetString();
                message.Sender = m.GetProperty("sender").GetProperty("emailAddress").GetProperty("address").GetString();
                message.ReceivedTime = m.GetProperty("receivedDateTime").GetDateTime();
                messages.Add(message);
            }
        }
    }


    public class MailMessage
    {
        public string Subject;
        public string Sender;
        public DateTime ReceivedTime;
    }
}
Let’s launch our app and ensure that we are logged out first as the current token won’t have the right permissions and we’ve changed quite a few things in our code. You’ll notice that the next time we log in, we are prompted for the newly added permissions which means that everything is working as expected. Now, beyond basic user profile data, the app is requesting access to our email data.
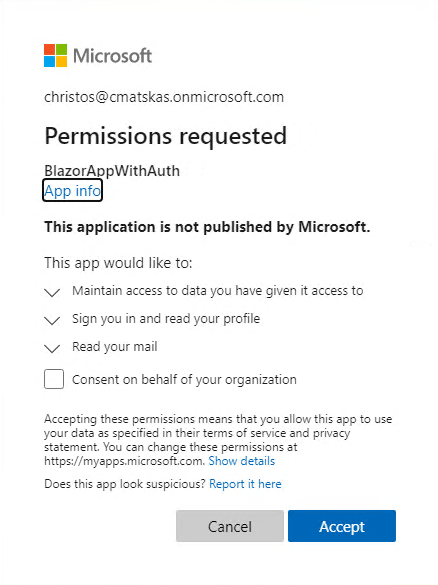
After granting consent we can navigate to the “Fetch Data” page to read some emails!
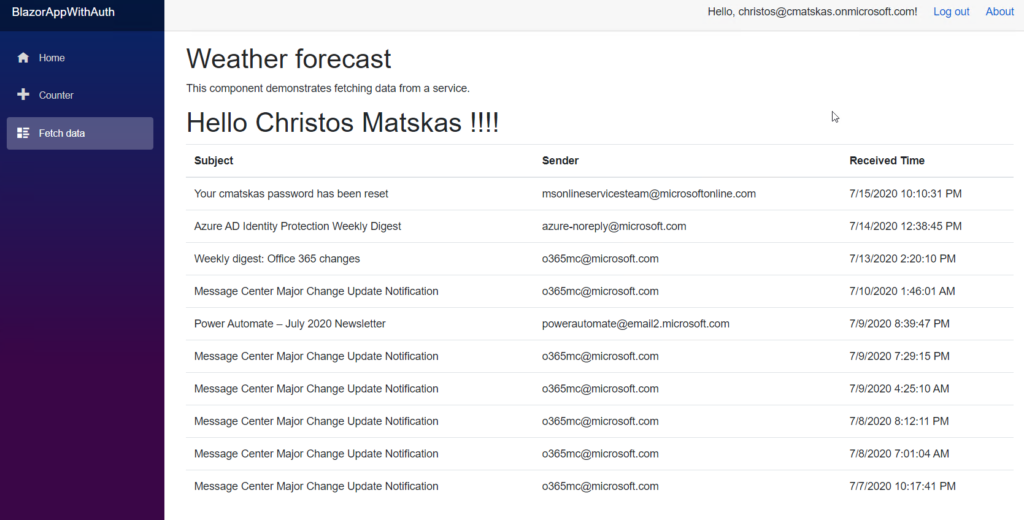
If you followed the steps correctly, you should now be able to see your email data as per the image above.
Summary
The new Microsoft.Identity.Web does a great job in simplifying authentication and token management and you should start using it today. Before wrapping up, a couple of things worth highlighting:
- Unlike normal web apps that can support dynamic/incremental consent, in Blazor you need to request all the scopes necessary for your application up front. Failing to do so will cause an error as the TokenAcquisition method will be unable to validate the token against the new permissions. This is part of the Blazor mechanics so something that keen in mind when creating your apps.
- Instead of hand rolling your Microsoft Graph HTTP requests, you should leverage the Microsoft Graph SDK which simplifies the interaction with Microsoft Graph and provides all the data objects you’ll need to serialize and deserialize from. However, in this instance we went with option 1 because we only make one call to Microsoft Graph.
Finally, you can find the full source code and a working example of this Blazor application on GitHub
 Light
Light Dark
Dark