
Customer ticketing solution on Kaizala
In this post, I will be exploring on how to get a customer support ticket management system on Kaizala. Instead of sending multiple text messages to give an update on the ticket status, we could just have a rich card that provides the ticket status. And, when there is a change in status, the card could be updated to reflect the latest status.
To achieve this, below are the steps that would be required:
- Build a card with custom chat card based on defined properties
- Call into an API to send the card ( scenario where ticket is raised )
- Call into an API to update the card ( scenario where ticket status changes )
Building card with custom chat card view
[Kaizala allows you to extend client side functionality using custom actions / cards. Microsoft documentation for developing a custom action can be found here.]
For building a card with custom chat card, we will need to define the sourceLocation of the chat canvas card view in package.json. Unlike the Response view, creation view or results / summary view – which are html / JS based, the chat card takes a declarative schema [more about it here].
package.json
For this demo, you will not need the ResponseView, CreationView or ResultsView as the ticket information would be present in the chat canvas itself. Notice the sourceLocation in the example below.
{
 "id": "com.gls.xyz.care",
 "schemaVersion": 1,
 "displayName": "Customer Support",
 "providerName": "GLS-Test",
 "icon": "AppIcon.png",
 "version": "1",
 "minorVersion": "1",
 "appModel": "AppModel.json",
 "description": "Package for sending customer ticket [test]",
 "dials": {
 "isLocalised": false,
 "isPinned": false
 },
 "views": {
 "ChatCanvasCardView": {
 "sourceLocation": "ChatCardView.json",
 "showReceipts": true,
 "showLikes": false,
 "showComments": false,
 "showExpiry": false,
 "showFooter": true,
 "showHeader": false,
 "showFooter": false,
 "isResponseEditable": false
 }
 }
}
ChatCardView.json
The chat card here has four fields: one hard-coded to “XYZ CUSTOMER CARE” and the other 3 fields fed from properties: customername, ticketnumber and ticketstatus.
{
 "schemaVersion":2,
 "schema":{
 "type":"container",
 "initialHeight":300,
 "layout":"vertical",
 "children":[
 {
 "type":"text",
 "paddingLeft":10,
 "paddingRight":10,
 "paddingTop":10,
 "paddingBottom":10,
 "string":"XYZ CUSTOMER CARE",
 "fontSize":18,
 "fontStyle":"bold",
 "textColor":"#ffffff",
 "backgroundColor":"#fcb72d",
 "textAlignment":"center",
 "maxNumberOfLines":1,
 "marginBottom":10
 },
 {
 "type":"text",
 "paddingLeft":10,
 "paddingRight":10,
 "string":"${Form.properties[customername].value}",
 "fontSize":18,
 "fontStyle":"regular",
 "textColor":"#000000",
 "backgroundColor":"#ffffff",
 "textAlignment":"left",
 "maxNumberOfLines":5,
 "marginBottom":10
 },
 {
 "type":"text",
 "paddingLeft":10,
 "paddingRight":10,
 "string":"${Form.properties[ticketnumber].value}",
 "fontSize":18,
 "fontStyle":"regular",
 "textColor":"#000000",
 "backgroundColor":"#ffffff",
 "textAlignment":"left",
 "maxNumberOfLines":2,
 "marginBottom":10
 },
 {
 "type":"text",
 "paddingLeft":10,
 "paddingRight":10,
 "string":"${Form.properties[ticketstatus].value}",
 "fontSize":18,
 "fontStyle":"regular",
 "textColor":"#000000",
 "backgroundColor":"#ffffff",
 "textAlignment":"left",
 "maxNumberOfLines":2,
 "marginBottom":10
 }
 ]
 }
}
AppModel.json
Just create an AppModel with the title and empty questions array.
{
 "title": "XYZ Customer Support",
 "questions": []
}
Sending ticket from API
To send the ticket via API, we would be using the actions endpoint as shown below. Notice the subscribers array – since we need to send this targeted to the particular subscriber ( for more information, you can refer the post Move SMS notifications to Kaizala ).
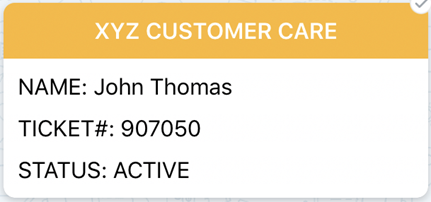
Executing this API would give you the referenceId and actionId. Cache this actionId as we will need it in the next step. In the below example, we have set the customername, ticketnumber and ticketstatus properties to “NAME: John Thomas”, “TICKET#: 907050”, “STATUS: ACTIVE” respectively.
| Method | POST |
| URL | {{endpoint-url}}/v1/groups/{{test-group-id}}/actions |
| Request Body | { id:”com.gls.xyz.care”, subscribers:[“{{subscriber-mobile-number}}”], sendToAllSubscribers:false, actionBody:{ properties:[ { name:”customername”, value:”NAME: John Thomas”, type:”Text” }, { name:”ticketnumber”, value:”TICKET#: 907050″, type:”Text” }, { name:”ticketstatus”, value:”STATUS: ACTIVE”, type:”Text” } ] } } |
Updating the ticket status using API
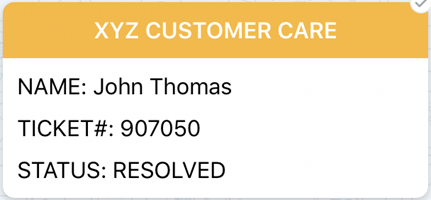
As the ticket status changes, you would need to update the status on the card that was sent. For that we would be using the actions/<<action-id>>/properties endpoint. In the below example, we would be updating the ticket status to RESOLVED. Notice that the actionId is the ID of the action sent in the earlier step.
| Method | PUT |
| URL | {{endpoint-url}}/v1/groups/{{test-group-id}}/actions/{{actionId}} |
| Request Body | { “version”:-1, “updateProperties”: [ { “name” : “ticketstatus”, “type” : “Text”, “value” : “STATUS: RESOLVED” } ] } |
Screenshots of the demo
Ticket sent from API
Ticket after updating the status from API
Thank you for reading! Hope that was helpful. I have shared the package at here, in case you want to give it a shot. ( don’t forget to change the package id before uploading to Kaizala to prevent conflicts ). If there is anything else you want me to cover, let me know through the comments section.
 Light
Light Dark
Dark