A Lap around Microsoft Graph Toolkit Day 11 – Microsoft Graph Toolkit Proxy Provider
Author: Ashish Trivedi, Microsoft Office Development MVP
Introduction
Hey devs, welcome to day 11 of the Microsoft Graph Toolkit blog series! Today we will explore the Microsoft Graph Toolkit proxy provider.
What is the proxy provider?
As the name suggests, this Microsoft Graph Toolkit (MGT) provider enables you to use a proxy API behind the Graph Toolkit components rather than calling the Microsoft Graph API directly. You will transform the API calls such as below –
https://graph.microsoft.com/v1.0/me ==> https://YourAPI.com/api/GraphProxy/v1.0/me
When you use the proxy provider, you can use your backend authentication to power the Microsoft Graph Toolkit by routing calls to Microsoft Graph through your own backend.
- You can use the proxy provider in various application development scenarios, two of them are listed as below – If you’re an ISV enterprise partner developing products that call product–specific APIs along with Microsoft Graph APIs, you can bundle them all with the proxy provider.
- If you’re a partner / developer you can manage all your API calls and authentication in your custom API proxy provider, hiding complexity away.
Sounds exciting? Let’s build a sample on ASP.NET MVC model to easily understand this.
A guide to build proxy provider application
Step 1 – Setup the development environment
For trying the sample written in this blog post, you will need a Microsoft 365 tenant where you have admin access. If you don’t have one, you can join Microsoft 365 Developer program. To write and compile code, we will be using Visual Studio. If you don’t have one, you can download the Visual Studio Community edition for free.
Step 2 – Create your application
Before you can start writing you application by following the steps detailed below, if you have not done any application development using Microsoft Graph Toolkit previously, please read through the season 1 articles of A Lap around Microsoft Graph Toolkit to familiarize yourself.
Now, you are ready to build your first application with the proxy provider.
Register your application
To follow along with the exercise in this blog, you will need to create a new Azure AD web application registration in Azure Portal.
- Login to Azure Portal using the account you created with your developer subscription.
2. Select Azure Active Directory in the left-hand navigation, then select App registrations under Manage and click New registration.
3. On the register an application page, set the following values:
- Set Name = MGT-ProxyProvider-App (or any name you would like for your application)
- Set Supported account types = Accounts in any organizational directory (Any Azure AD directory – Multitenant)
- Under Redirect URI, set the drop down to Web and set value to https://localhost:44375/ (verify later if you have a different URL in your project as SSL then add the new URL here).

4. Click Register. Locate your application (client) ID. You will need to reference this later.

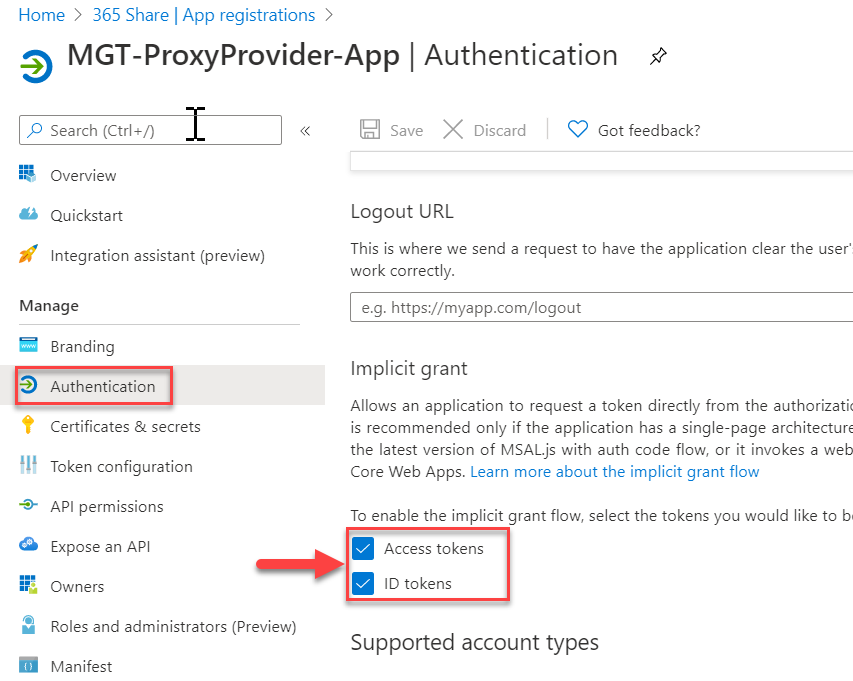
5. Under Manage on the left-hand navigation, select Authentication. Locate the Implicit Grant section and enable both Access tokens and ID tokens, then click Save.

- Under Manage on the left-hand navigation, select Certificates & Secrets. Under Client secrets, click +New client secret. On the Add a client secret pop-up, give a description as ‘MGT-Proxy-Provider-App-Secret’ or your own description. Select the Expires duration and click Add.
- Copy the Secret value for later use.
Start coding
In our application code, we will need to first setup the application to work with Azure AD based authentication and call Microsoft Graph API using user claims.
Once you completed the module, you will have the base ready, which we will modify as shown below to add Microsoft Graph Toolkit components and our proxy provider.
- Under App_Start folder, add the following class. The purpose of adding this class is to make our Proxy API routed.
public static class WebApiConfig {
    public static void Register(HttpConfiguration config)
    {
        config.MapHttpAttributeRoutes();
        config.Routes.MapHttpRoute(
            name: "DefaultApi",
            routeTemplate: "api/{controller}/{id}",
            defaults: new { id = RouteParameter.Optional }
        );
    }
}
- Under App_Start folder, in the Startup.Auth.cs file, replace the existing function with the following function. The highlighted change is to use the CachedUser class to transpose the Microsoft Graph User object.
private async Task OnAuthorizationCodeReceivedAsync(AuthorizationCodeReceivedNotification notification) {
    var idClient = ConfidentialClientApplicationBuilder.Create(appId)
        .WithRedirectUri(redirectUri)
        .WithClientSecret(appSecret)
        .Build();
    var signedInUser = new ClaimsPrincipal(notification.AuthenticationTicket.Identity);
    var tokenStore = new SessionTokenStore(idClient.UserTokenCache, HttpContext.Current, signedInUser);
    try
    {
        string[] scopes = graphScopes.Split(' ');
        var result = await idClient.AcquireTokenByAuthorizationCode(scopes, notification.Code).ExecuteAsync();
        var userDetails = await GraphHelper.GetUserDetailsAsync(result.AccessToken);
        var cachedUser = new CachedUser()
        {
            DisplayName = userDetails.DisplayName,
            Email = string.IsNullOrEmpty(userDetails.Mail) ?
            userDetails.UserPrincipalName : userDetails.Mail,
            Avatar = string.Empty
        };
        tokenStore.SaveUserDetails(cachedUser);
    }
    catch (MsalException ex)
    {
        string message = "AcquireTokenByAuthorizationCodeAsync threw an exception";
        notification.HandleResponse();
        notification.Response.Redirect($"/Home/Error?message={message}&debug={ex.Message}");
    }
    catch (Microsoft.Graph.ServiceException ex)
    {
        string message = "GetUserDetailsAsync threw an exception";
        notification.HandleResponse();
        notification.Response.Redirect($"/Home/Error?message={message}&debug={ex.Message}");
    }
}
- Under Controllers folder, update the CalendarController class as below. This is to make sure we are using only the default Microsoft Graph Toolkit component for calendar events.
public class CalendarController : BaseController
{
    // GET: Calendar
    [Authorize]
    public ActionResult Index()
    {
        return View();
    }
}
4. Under Controller folder, add the GraphProxyController class as below. This class manages all HTTP calls and perform the authentication and return the result back to calling view.
[RoutePrefix("api/GraphProxy")]
public class GraphProxyController : ApiController {
    [HttpGet]
    [Route("{*all}")]
    public async Task<HttpResponseMessage> GetAsync(string all)
    {
        return await ProcessRequestAsync("GET", all, null).ConfigureAwait(false);
    }

    private async Task<HttpResponseMessage> ProcessRequestAsync(string method, string all, object content)
    {
        var graphClient = GraphHelper.GetAuthenticatedClient();
        var request = new BaseRequest(GetURL(all, graphClient), graphClient, null)
        {
            Method = method,
            ContentType = HttpContext.Current.Request.ContentType,
        };
        var neededHeaders = Request.Headers.Where(h => h.Key.ToLower() == "if-match").ToList();
        if (neededHeaders.Count() > 0)
        {
            foreach (var header in neededHeaders)
            {
                request.Headers.Add(new HeaderOption(header.Key, string.Join(",", header.Value)));
            }
        }

        var contentType = "application/json";
        try
        {
            using (var response = await request.SendRequestAsync(content, CancellationToken.None, HttpCompletionOption.ResponseContentRead).ConfigureAwait(false))
            {
                response.Content.Headers.TryGetValues("content-type", out var contentTypes);
                contentType = contentTypes?.FirstOrDefault() ?? contentType;
                var byteArrayContent = await response.Content.ReadAsByteArrayAsync().ConfigureAwait(false);
                return ReturnHttpResponseMessage(HttpStatusCode.OK, contentType, new ByteArrayContent(byteArrayContent));
            }
        }
        catch (ServiceException ex)
        {
            return ReturnHttpResponseMessage(ex.StatusCode, contentType, new StringContent(ex.Error.ToString()));
        }
    }

    private static HttpResponseMessage ReturnHttpResponseMessage(HttpStatusCode httpStatusCode, string contentType, HttpContent httpContent)
    {
        var httpResponseMessage = new HttpResponseMessage(httpStatusCode)
        {
            Content = httpContent
        };
        try
        {
            httpResponseMessage.Content.Headers.ContentType = new MediaTypeHeaderValue(contentType);
        }
        catch
        {
            httpResponseMessage.Content.Headers.ContentType = new MediaTypeHeaderValue("application/json");
        }

        return httpResponseMessage;
    }

    private string GetURL(string all, GraphServiceClient graphClient)
    {
        var urlStringBuilder = new StringBuilder();
        var qs = HttpContext.Current.Request.QueryString;
        if (qs.Count > 0)
        {
            foreach (string key in qs.Keys)
            {
                if (string.IsNullOrWhiteSpace(key)) continue;
                string[] values = qs.GetValues(key);
                if (values == null) continue;
                foreach (string value in values)
                {
                    urlStringBuilder.Append(urlStringBuilder.Length == 0 ? "?" : "&");
                    urlStringBuilder.AppendFormat("{0}={1}", Uri.EscapeDataString(key), Uri.EscapeDataString(value));
                }
            }
            urlStringBuilder.Insert(0, "?");
        }
        urlStringBuilder.Insert(0, $"{GetBaseUrlWithoutVersion(graphClient)}/{all}");
        return urlStringBuilder.ToString();
    }

    private string GetBaseUrlWithoutVersion(GraphServiceClient graphClient)
    {
        var baseUrl = graphClient.BaseUrl;
        var index = baseUrl.LastIndexOf('/');
        return baseUrl.Substring(0, index);
    }
}
5. Under Helpers folder, in the GraphHelper class to function with the following function. We are using the built-in Microsoft.Graph.User object in place of the CachedUser object. –
public static async Task<Microsoft.Graph.User> GetUserDetailsAsync(string accessToken)
{
    var graphClient = new GraphServiceClient(
       new DelegateAuthenticationProvider(
          async (requestMessage) =>
          {
              requestMessage.Headers.Authorization =
              new AuthenticationHeaderValue("Bearer", accessToken);
          }));
    return await graphClient.Me.Request().GetAsync();
}
6. Under Models folder, delete the CachedUser.cs. We do not require the CachedUser object as model. We are using the built-in Microsoft.Graph.User object.
7. Under TokenStorage folder, in SessionTokenStore.cs file, he following class. We will create a CachedUser class here and use it for storing the user in cache.
public class CachedUser {
    public string DisplayName { get; set; }
    public string Email { get; set; }
    public string Avatar { get; set; }
}
So far, we have added backend code to make our Proxy API so that an MGT component can call it.
Now, let’s make changes to the UI to add a MGT component and call proxy API.
1. Edit code file located at path as Views à Calendar à Index.cshtml, update the file content as below. This will show signed in user calendar items.
<h1>Calendar</h1>
<mgt-agenda group-by-day></mgt-agenda>
2. Edit code file located at path as Views à Home à Index.cshtml, update the file content as below. This will let you sign-in and allow you to do hover on each person card returned.
@{
    ViewBag.Current = "Home";
}

<div class="jumbotron">
    <h1>ASP.NET Microsoft Graph Toolkit Tutorial</h1>
    <p class="lead">This sample app shows how to use the Microsoft Graph Toolkit with ASP.NET</p>
    @if (Request.IsAuthenticated)
    {
        <h4>Welcome @ViewBag.User.DisplayName!</h4>
        <p>Use the navigation bar at the top of the page to get started.</p>
        <h4>People</h4>
        <p>These are the people you work with the most</p>
        <mgt-people>
            <template>
                <div data-for="person in people">
                     <mgt-person person-details="{{person}}" view="twolines" fetch-image person-card="hover">
                </div>
            </template>
        </mgt-people>
    }
    else
    {
        @Html.ActionLink("Click here to sign in", "SignIn", "Account", new { area = "" }, new { @class = "btn btn-primary btn-large" })
    }
</div>
3. And it last, we need to load the MGT JavaScript and proxy settings so that we can execute it as required. For this edit file in path as Views à Shared à _Layout.cshtml, we need to update file content as below –
- In the head section, add the following script –
<script src="https://unpkg.com/@Html.Raw("@")microsoft/mgt/dist/bundle/mgt-loader.js"></script>
<script>
    const provider = new mgt.ProxyProvider("/api/GraphProxy");
    provider.login = () => window.location.href = '@Url.Action("SignIn", "Account")';
    provider.logout = () => window.location.href = '@Url.Action("SignOut", "Account")';
    mgt.Providers.globalProvider = provider;
</script>
<style>
    mgt-login {
        --color: white;
        --padding: 8px;
        --background-color--hover: transparent;
    }
</style>
- Replace body section as below. This is to show the navigation items once authenticated.
<body>
    <nav class="navbar navbar-expand-md navbar-dark fixed-top bg-dark">
        <div class="container">
            @Html.ActionLink("ASP.NET Microsoft Graph Toolkit", "Index", "Home", new { area = "" }, new { @class = "navbar-brand" })
            <button class="navbar-toggler" type="button" data-toggle="collapse" data-target="#navbarCollapse"
                    aria-controls="navbarCollapse" aria-expanded="false" aria-label="Toggle navigation">
                <span class="navbar-toggler-icon"></span>
            </button>
            <div class="collapse navbar-collapse" id="navbarCollapse">
                <ul class="navbar-nav mr-auto">
                    <li class="nav-item">
                        @Html.ActionLink("Home", "Index", "Home", new { area = "" },
                            new { @class = ViewBag.Current == "Home" ? "nav-link active" : "nav-link" })
                    </li>
                    @if (Request.IsAuthenticated)
                    {
                        <li class="nav-item" data-turbolinks="false">
                            @Html.ActionLink("Calendar", "Index", "Calendar", new { area = "" },
                                new { @class = ViewBag.Current == "Calendar" ? "nav-link active" : "nav-link" })
                        </li>
                    }
                </ul>
                <ul class="navbar-nav justify-content-end">
                    <li class="nav-item">
                        <a class="nav-link" href="https://aka.ms/mgt-docs" target="_blank">
                            <i class="fas fa-external-link-alt mr-1"></i>Docs
                        </a>
                    </li>
                    <li class="nav-item">
                        <mgt-login></mgt-login>
                    </li>
                </ul>
            </div>
        </div>
    </nav>
    <main role="main" class="container">
        @foreach (var alert in alerts)
        {
            <div class="alert alert-danger" role="alert">
                <p class="mb-3">@alert.Message</p>
                @if (!string.IsNullOrEmpty(alert.Debug))
                {
                    <pre class="alert-pre border bg-light p-2"><code>@alert.Debug</code></pre>
                }
            </div>
        }
        @RenderBody()
    </main>
    @Scripts.Render("~/bundles/jquery")
    @Scripts.Render("~/bundles/bootstrap")
    @RenderSection("scripts", required: false)
</body>
Now, we will need the client/application ID and client secret to be added in the PrivateSettings.config file.
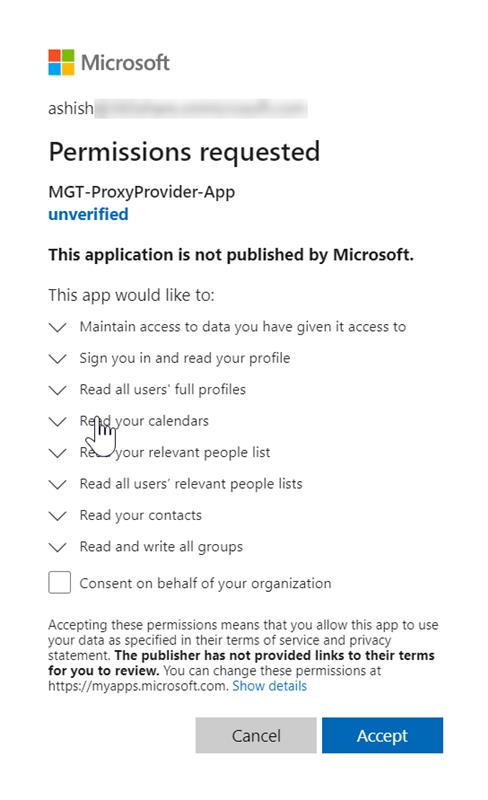
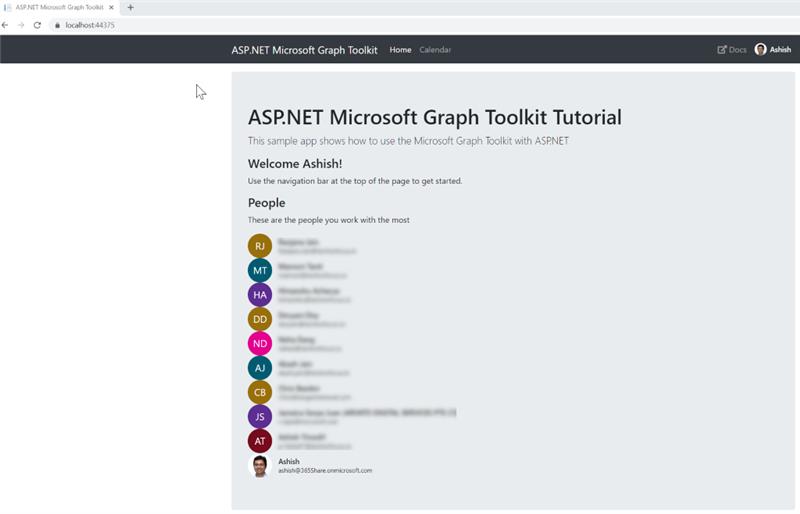
Once done, start the application in debug mode. For first instance, you will get the consent pop up message, once granted, you will be able to see details as below –
Default login page –

Consent dialog –

After Login successful –


Calendar Page –

Sign-out option-

Conclusion
It took only a few steps to build a ASP.NET MVC App to use Proxy provider for Microsoft Graph Tool kit components to call Microsoft Graph APIs, but we did it!
When you are done with building app, you can publish it on a web server, and anyone can use your application. For ISVs or partners, you can follow application publishing over marketplace guidelines. Stay tuned as we will have some ISV using Microsoft Graph success stories for you next week!
Hopefully, we were able to demonstrate how, by using the Proxy provider, you can build your own API and use with MGT components. This is just to present as how you can simply use your API to use with Microsoft Graph Toolkit components and with your custom service. That is the power of the Microsoft Graph Toolkit!
You can find the source code for this sample in the MGT-Samples. This is a MVC app based sample. If you would like to use a .NET Core based, then look at the sample here.

 Light
Light Dark
Dark