
Microsoft Graph Mailbag – Getting Started with the Microsoft Graph PowerShell SDK
In this Microsoft Graph Mailbag blog post, we focus on using the Microsoft Graph API from a system administrator perspective, specifically getting started with the Microsoft Graph PowerShell SDK.

Please be sure to follow this blog series using https://aka.ms/MSGraphMailbag or with RSS using https://developer.microsoft.com/graph/blogs/feed/?tag=MSGraphMailbag.
Introduction
As a non-developer, seeing terms like “API”, “REST”, and “SDK” can be a bit intimidating. I want to assure you that knowledge of development and experience working with APIs isn’t necessary to enjoy the benefits of Microsoft Graph API. With a few new skills, we’ll be building scripts calling Microsoft Graph in no time.
I’ll be the first to admit I’m not a developer. As an Exchange engineer, developing applications wasn’t a core job function. I did realize however, that scripting was a skillset that would make my life easier. Our day-to-day workloads likely include repetitive tasks that many of us have learned to automate using a scripting language like PowerShell. If you’ve already invested the time to learn PowerShell, I will show how to utilize existing skillsets to build useful tools and processes that include Microsoft Graph.
Background
A little background to get started with Microsoft Graph. It is a RESTful web API, so it uses web requests to submit calls to an endpoint. By providing a method (GET, POST, PATCH, PUT, DELETE) with the request, we can access and interact with data and resources within a Microsoft 365 tenant. We can make requests to the endpoints in two ways – using an SDK or a manual HTTP request. The Microsoft Graph PowerShell SDK allows you to issue PowerShell commandlets (also called cmdlets) like Get-MGUser to make calls. The manual method uses Invoke-RestMethod or Invoke-WebRequest to manually submit an HTTP request to the Microsoft Graph API. Whether using the PowerShell module or the Invoke-RestMethod/Invoke-WebRequest cmdlets, we can use our PowerShell know-how to interact with the Microsoft Graph API.
Getting Started
Normally, we would run a PowerShell script using a user account (admin account or service account) as part of a scheduled task or even manually. Microsoft Graph authentication is different. Microsoft Graph requires an access token to be submitted with each HTTP request. This token is issued by the Microsoft identity platform and contains information used to validate the requestor and the specific permission(s) they have within the API. Before our PowerShell script can get an access token, we need to register an application through the Azure Portal. This app registration is where we get the required information to connect to Microsoft Graph: Application ID, Tenant ID, Client Secret, Redirect URI, and permissions. We assign or configure these through the application registration process.
Covering the app registration process could be an entire blog post, so for our purposes, we’ll assume we are using application permissions. This allows us to simplify the authentication process as there is no username/password requirement and Microsoft Graph permissions are applied to the application itself. (If you are interested in hearing more about application vs delegated permissions, see the Authentication and authorization basic for Microsoft Graph documentation or please let us know using the #MSGraphMailbag hashtag on Twitter).
For this example, we’ll perform an app-only authentication using the Microsoft Graph PowerShell SDK and submit our application ID and certificate as credentials to receive the access token. The certificate is created locally and then uploaded to the app registration. It is used in place of the client secret as a more secure method of authentication.
The PowerShell Graph SDK will handle authentication and manage the access tokens for us. This is nice because we don’t need to build logic in our script to keep track of the access token or handle information like token expiration for long running sessions. We can call the ‘Connect-MGGraph’ cmdlet, pass in information from our app registration, and we’re authenticated and ready to work with the Microsoft Graph API. The example below shows how to authenticate using app-only authentication and the PowerShell Graph SDK:

(text from image above)
$appID = “From App Registration”
$tenantId = “From App Registration”
$authCertThumb = “From App Registration”
#Connect to Microsoft Graph using Microsoft Graph PowerShell SDK
Connect-MgGraph -ClientId $appID -TenantId $tenantID -CertificateThumbprint $authCertThumb
For more information, see Use app-only authentication with the Microsoft Graph PowerShell SDK.
Querying Microsoft Graph data
Let’s look at a simple query like getting a list of users in a tenant. With the Microsoft Graph PowerShell SDK, this is one cmdlet, and we’ll save the results to a variable:
![]()
(text from image above)
$Users = Get-MGUser
In this request, we are getting information from the ‘/users’ endpoint in Microsoft Graph and saving that data in the $Users PowerShell variable. Notice that we don’t have to submit any of required information for a HTTP request like we would be using the manual Invoke-RestMethod cmdlet. The SDK hides that manual layer and takes care of things such as the HTTP method, Uri, and the access token allowing us to interact with Microsoft Graph using PowerShell syntax.
Let’s look at the $Users variable:
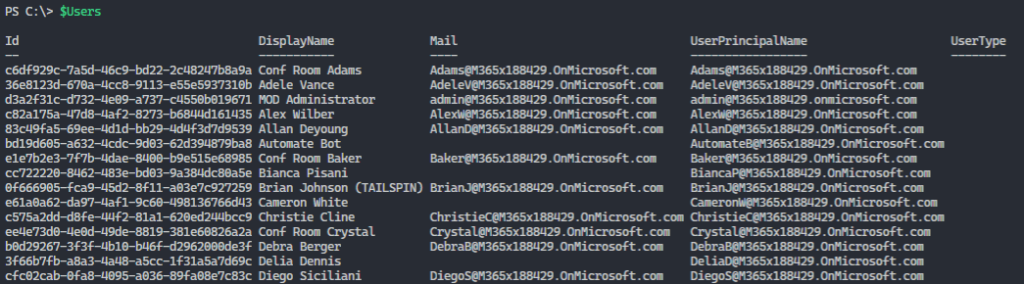
We now have a set of PowerShell Objects obtained from Microsoft Graph that we can start interacting with using PowerShell functionality.
Count:
![]()
(text from image above)
$Users.Count
Format-List:
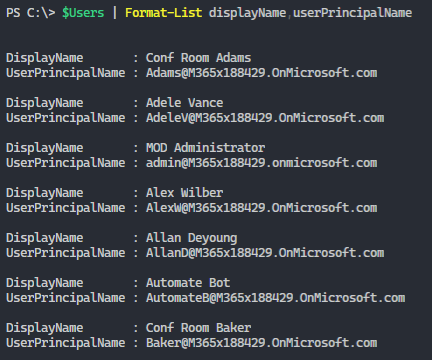
(text from image above)
$Users | Format-List displayName, userPrincipalName
Loops:
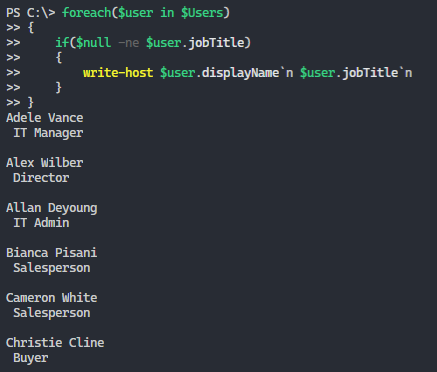
(text from image above)
Foreach($user in $Users)
{
    If($null -ne $user.jobTitle)
    {
        Write-Host $user.displayName`n $user.jobTitle`n
    }
}
Filter results:
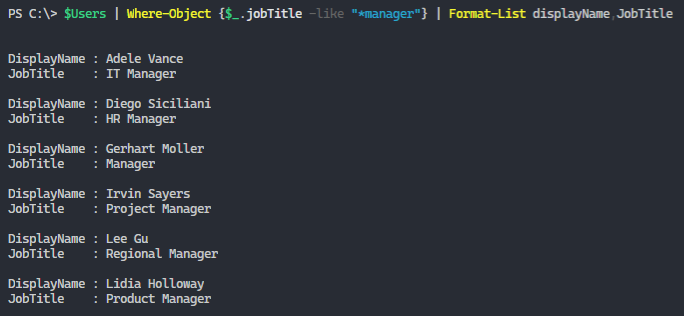
(text from image above)
$Users | Where-Object {$_.jobTitle -like “*manager”} | Format-List displayName, jobTitle
Modifying Microsoft Graph data
Querying Microsoft Graph API for data using PowerShell is great and can be useful. But, what if we want to interact with the data in Microsoft Graph rather than just read it?
Extra Credit: Creating and editing data in Microsoft Graph requires us to submit information in JSON format as part of the body of a request. For those of you not familiar with JSON, it is a way to format and organize name/value pairs similar to XML. It is a common method of interacting with web APIs.
The good news is that the Microsoft Graph PowerShell SDK does the heavy lifting for us. The manual HTTP request would require us to build out the JSON data and submit it as part of the HTTP request. The PowerShell SDK still allows this using the ‘-BodyParameter’ parameter but simplifies the process by surfacing attribute parameters through the cmdlet.
Let’s look at a simple edit command to update the jobTitle of a specific user:
![]()
(text from image above)
Update-MgUser -UserId AdeleV@M365x188429.OnMicrosoft.com -JobTitle “Regional Manager”
We are making a request to the ‘/users’ endpoint and specifying an individual user to edit. The cmdlet takes care of the HTTP method, the Uri, the access token, and in this case the body of the request that specifies the desired change. Microsoft Graph PowerShell SDK puts the request in a format that is familiar to PowerShell users allowing us to pass in parameters like ‘-jobTitle’ in place of JSON formatted data.
Conclusion
In this post, we covered what is needed to start working with Microsoft Graph using PowerShell and how to utilize our current PowerShell skills with the Microsoft Graph PowerShell SDK. This allows us to directly interact with Microsoft Graph in a familiar way. We’ve just scratched the surface. I plan on digging in deeper into the benefits and features of the Microsoft Graph PowerShell SDK in a future post. Until next time!
Today’s post was written by Matt Krause, Customer Engineer (CE) at Microsoft. You can follow Matt on Twitter @mattckrause. Join us for our next post April 13th, 2021.
 Light
Light Dark
Dark