
Microsoft Graph Mailbag – Taking advantage of mgt-get component in the Microsoft Graph Toolkit
In today’s Microsoft Graph Mailbag post we will cover one of the most flexible components of the Microsoft Graph Toolkit, the mgt-get component! If you want to learn more about the Microsoft Graph Toolkit and get a primer on its capabilities, we suggest revisiting a blog series written by the team and community members called A Lap around Microsoft Graph Toolkit.
Please be sure to follow this blog series using https://aka.ms/MSGraphMailbag or with RSS using https://developer.microsoft.com/graph/blogs/feed/?tag=MSGraphMailbag.
Getting started with the Microsoft Graph Toolkit mgt-get component
Unlike the other components of the Microsoft Graph Toolkit, the mgt-get component allows developers to build custom Microsoft Graph queries and their own HTML to render the data that is returned by Microsoft Graph. The component does not provide any default UI and requires you to write a template from scratch.
To get started, we recommend you take a look at the Zero to Hero blog post from the Lap around Microsoft Graph Toolkit blog series to get your environment ready.
Building your first custom component with mgt-get
Let us start by creating a very simple custom component using mgt-get. This first component will display the first name, last name, and email of the currently logged in user.
The component will require 2 main attributes: the resource to query and the necessary scopes.
<mgt-get resource="/me" scopes="User.Read">
  <template>
    Hello, {{ givenName }} {{ surname }}! Your email is {{ mail }}
  </template>
</mgt-get>
As you can see, the result returned by the /me endpoint of Microsoft Graph is available within your template thanks to the use of brackets. The result is simple but powerful HTML rendered with the data provide by Microsoft Graph.

List content with mgt-get
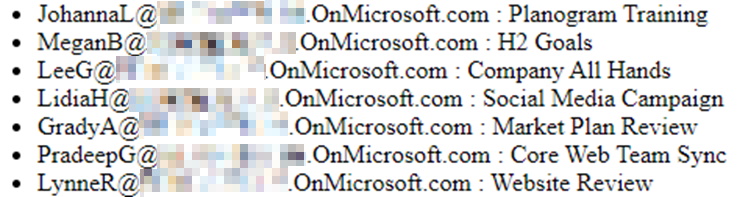
Not only can you display a specific object when utilizing the mgt-get component, but also any list of data. For example, if you want to display a list of messages as part of your template, you need to be able to format and display all your messages in a certain way. The template will support different operations like conditional formatting and looping. This will help us to render a template in a way that brings some logic and control. With the following example, it is possible to display all the messages that are in the currently logged in user’s inbox.
<mgt-get resource="/me/mailFolders/Inbox/messages" scopes="Mail.Read">
  <template>
    <ul>
      <li data-for="email in value">
        {{ email.sender.emailAddress.address }} : {{ email.subject }}
      </li>
    </ul>
  </template>
</mgt-get>
This template will list all the emails as a simple unordered list and will allow you to fully style it.
Advanced scenarios with mgt-get
Debugging
While you are developing templates, you will want to peek at the data that is returned by Microsoft Graph. You can use template capabilities to leverage a helper method to display the raw object directly in the UI while you are developing.
<mgt-get resource="/me" scopes="User.Read">
  <template>
    {{ this }}
  </template>
</mgt-get>

Converting data
If you want to bring this capability to the next level, you can also add features to augment the data, to do advanced formatting or to bring any of your custom logic to your templates. In the following example, we use a custom converter to allow logging to the browser console when messages are rendered.
<mgt-get id="mgt-get-events" resource="/me/mailFolders/Inbox/messages" scopes="Mail.Read">
  <template>
    <ul>
      <li data-for="email in value">
        {{ getFormattedMessage(email) }}
      </li>
    </ul>
  </template>
</mgt-get>

<script>
  document.querySelector('#mgt-get-events').templateContext = {
    getFormattedMessage: (message) => {
      console.log(message);
      return `${message.sender.emailAddress.address} : ${message.subject}`;
    }
  }
</script>
Caching data
To improve performance and to avoid round trips to Microsoft Graph, the mgt-get component supports caching data which will make a big difference when building custom components with the Microsoft Graph Toolkit. In order to enable caching you only need to specify “cache-enabled” on your component and the component will make sure your calls are cached at the browser level. Using the “cache-invalidation-period” you can also modify how long this item will be cached for the current user.
<mgt-get resource="/me" scopes="User.Read" cache-enabled="true">
  <template>
    Hello, {{ givenName }} {{ surname }}! Your email is {{ mail }}
  </template>
</mgt-get>
Nesting components
In more complex scenarios, you will want to do subsequent calls to Microsoft Graph to get more details or related information about an item that was retrieved. Luckily, the templating system of the Microsoft Graph Toolkit allows for nesting components. If you want to include a mgt-get component within another mgt-get component, it is possible! For example, you want to find your manager and then discover all the files trending around them. To achieve this, you can nest the following components.
<mgt-get resource="/me/manager" scopes="User.Read.All">
  <template>
    Hello, your manager is {{ givenName }} {{ surname }}! Their email is {{ mail }}! The following list is what is trending around them :

    <mgt-get resource="/users/{{ id }}/insights/trending" scopes="Sites.Read.All" cache-enabled="true">
      <template>
        <ul>
          <li data-for="file in value">
            <a href="{{ file.resourceReference.webUrl }}">{{ file.resourceVisualization.title }}</a>
          </li>
        </ul>
      </template>
    </mgt-get>
  </template>
</mgt-get>

Using other mgt components
Finally, as we discovered it is possible to nest components within other components, one of the great capabilities is to utilize the other Microsoft Graph Toolkit components as part of your custom template. You could for instance leverage the mgt-person component to highlight your manager in a rich way.
<mgt-get resource="/me/manager" scopes="User.Read.All" cache-enabled="true">
  <template>
    Hello, your manager is <mgt-person user-id="{{ id }}" view="oneline" show-presence="true" person-card="hover"></mgt-person> <br />

    The following list is what is trending around them :

    <mgt-get resource="/users/{{ id }}/insights/trending" scopes="Sites.Read.All" cache-enabled="true">
      <template>
        <ul>
          <li data-for="file in value">
            <a href="{{ file.resourceReference.webUrl }}">{{ file.resourceVisualization.title }}</a>
          </li>
        </ul>
      </template>
    </mgt-get>
  </template>
</mgt-get>


Conclusion
In today’s post, we looked at ways you can leverage the mgt-get component to build rich end-user experiences with the Microsoft Graph Toolkit. If you have any feedback or suggested features for the Microsoft Graph Toolkit, please open an issue on the GitHub repository!
You can also find a working example on the following GitHub repository!
Today’s post was written by Sébastien Levert, Sr. Customer and Partner Experience PM with the Microsoft Graph Team. You can follow Sébastien on Twitter @sebastienlevert. Join us for our next Microsoft Graph Mailbag post Jan 26, 2021.
 Light
Light Dark
Dark