
This is the third article in a series about Agent Experience (AX): the practice of making AI coding agents work correctly with your technology. The series covers what you can and can’t control in the agent stack, how to measure whether your extensions are helping or hurting, and how to iterate toward better outcomes.
You shipped your skill, wrote clear instructions, developers install it, and agents discover it. Everything looks like it’s working. But is the generated code actually better because of your extension? Or would the agent have produced the same result without it?
In the first article, we introduced lift and drag: your extension either improves outcomes or makes them worse. In the second article, we traced step by step through the mechanics of how agents use your technology. Now comes the uncomfortable part: measuring which one you’re shipping.
You can’t tell by looking
The most common mistake in AX work is treating tool invocation as a success signal. Your skill got invoked, the agent followed the instructions, it generated code. Done, right?
Not even close. The agent might have generated the same code without your extension, because the model already knew your API from training data. Or worse: your extension returned so much content that it pushed relevant workspace context out of the window, and the agent missed a configuration file that would have made the code work on the first try. Your tool was called, it returned content, and outcomes got worse. From the outside, everything looks fine.
How would you know? You wouldn’t, at least not without measuring.
What measuring actually looks like
Measuring AX impact comes down to a controlled comparison. You define a task, run it with and without your extension, and compare the outcomes. Everything else stays the same: the model, the harness, the prompt, the workspace. The only variable is your extension.
This gives you two data points:
- Baseline: how does the agent perform using only the model’s training data and the workspace context?
- With extension: how does the agent perform when your extension is available?
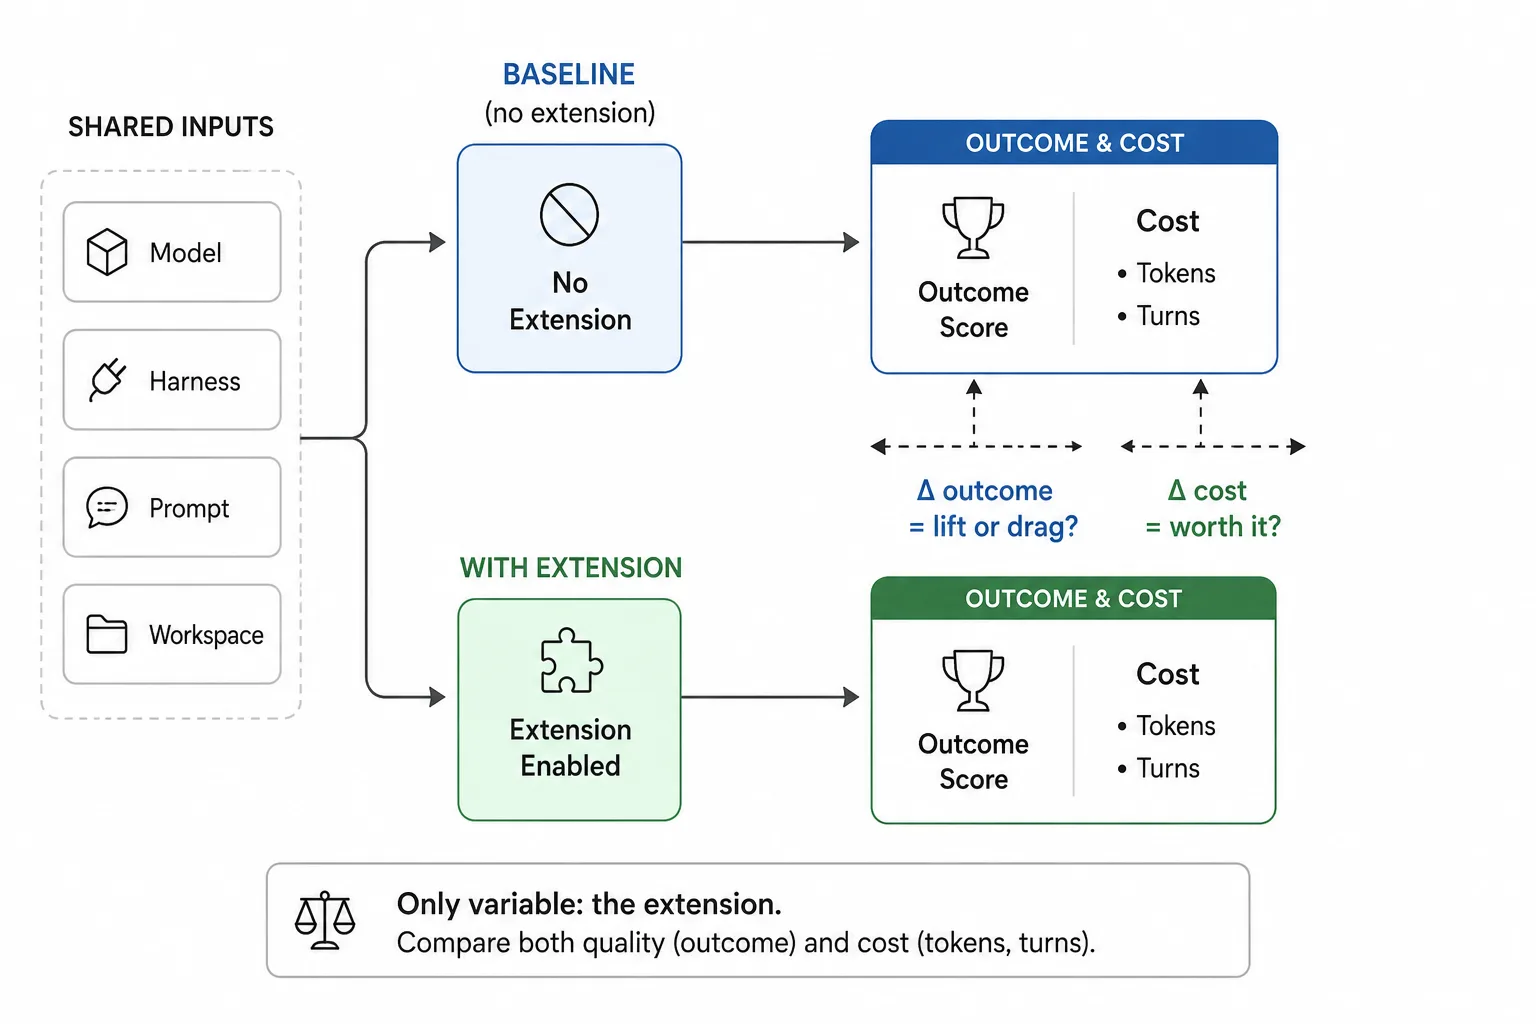
If outcomes improve with the extension, you’ve got lift. If they stay the same or get worse, you’ve got drag. But outcomes aren’t the only thing you’re comparing. Your extension adds tokens to the context window, triggers tool calls, and can increase the number of turns the agent needs. A scenario that completes in 3 turns without your extension might take 7 with it. If outcomes improve by 10% but token costs triple, that’s still lift, just an expensive one. This is why you must track both dimensions from the start: did it get better? and what did it cost?
Scenarios
A scenario is a specific task you ask the agent to complete: “Build a REST API with authentication using Contoso Identity” or “Add telemetry to this Express app using Contoso SDK.” Each scenario needs three things:
- A starting workspace. The repository state before the agent starts. This can be an empty folder if the scenario tests building from scratch, or a project with existing code, configuration files, and dependencies. Match the workspace to what the scenario represents, because agents behave differently in an empty folder than in a project with existing structure.
- A prompt. What you tell the agent to do. Keep it representative of what real developers actually ask for. Don’t optimize the prompt for your extension: write it the way a developer who doesn’t know your extension exists would write it.
- Evaluation criteria. How you determine whether the agent’s output is correct. This is the hard part.
Evaluation criteria
Evaluation criteria define what “correct” means for a given scenario. They’re the rubric you score against. There are two dimensions for you to consider: what you check, and how you check it.
What you check
Simple facts. Did the generated code use the v3 SDK instead of the deprecated v2? Does the project compile? Does a specific test pass? These are concrete, binary, and usually the first criteria you write.
Patterns and architecture. Did the code follow the recommended authentication flow? Does the error handling match the SDK’s conventions? Is the solution structured the way your documentation recommends? These require understanding intent and context, not just presence of a string or import.
Both types of checks produce pass/fail results. The difference is what it takes to verify them reliably.
How you check
Deterministic checks use code to verify criteria programmatically. Precise, repeatable, no ambiguity. But they’re harder to build correctly than they look. Take “does the code use the v3 SDK?” A naive string search for the v3 import statement would pass if the import appears in a comment, even though the code doesn’t actually use it. To do this properly, you’d need AST parsing to inspect the actual code structure, not just match text. That’s a meaningful development effort for each criterion, and every time you change what you’re measuring, you’re back writing and debugging grader code. For pattern checks it gets worse: verifying that authentication follows the PKCE flow means walking the AST to trace the code path. The grader code quickly becomes harder to maintain than the extension you’re evaluating.
LLM-as-judge checks the same criteria, but you write them in natural language. “The generated code imports and uses the v3 SDK in application code, not just in comments.” “The authentication flow uses the PKCE pattern with a redirect URI, not client credentials.” A capable model can distinguish a comment from actual code, trace authentication flows, and evaluate architectural patterns, all from a text description of what to look for.
The practical advantage is iteration speed. Adding, changing, or removing a criterion is editing a text file, not writing code. Anyone on the team can update the rubric without touching a codebase. When you mix deterministic graders with LLM-as-judge, you end up maintaining two systems, and the deterministic side needs a developer every time the criteria change.
That said, LLM judges have their own failure modes. Models can trip on seemingly simple things: ask one whether the used SDK version is within 3 minor versions of the required version, and some models get the math wrong, especially when minor versions cross into double digits. If you’re building your own judge harness, you might need to supply custom tools for things like version comparison, date parsing, or schema validation. The judge is only as reliable as the model behind it, and the model’s blind spots become your eval’s blind spots.
The tricky part with both approaches is writing good criteria. A vague criterion like “the code should be well-structured” gives you inconsistent scores regardless of how you check it. A specific criterion like “the authentication flow should use the PKCE pattern with a redirect URI, not client credentials” gives you reliable, repeatable results. Write criteria the same way you’d write acceptance criteria for a pull request: specific enough that two reviewers would agree on the verdict.
With LLM-as-judge, you also need to calibrate every time you update the criteria. After each change, verify:
- Accuracy: do the judge’s scores reflect what’s actually in the code? Run the judge against outputs where you already know the correct verdict. If the judge passes code that should fail (or vice versa), the criterion is ambiguous or the model is misinterpreting it.
- Consistency: does the judge return the same scores when you evaluate the same output multiple times? Even with temperature set to 0, you can get variation across runs if your criteria are ambiguous. Run the same evaluation multiple times and check whether the verdicts are stable. If a criterion flips between pass and fail on identical input, it’s not reliable enough to measure with.
Reliable evaluation criteria are the foundation of measurement. Do them wrong, and you end up amplifying noise and making decisions based on false signals.
Profiles
A profile is a configuration of the agent’s environment. At minimum, you need two:
- Baseline profile: no extensions installed. The agent works with just the model’s training data and workspace context.
- Extension profile: your extension installed and available.
Run every scenario against both profiles. The difference in outcomes is your extension’s impact. But two profiles only tell you whether your extension helps in isolation. Real developers have other extensions installed too, so you’ll want additional profiles:
- Extension + popular tools: your extension alongside the 5-10 most common extensions your audience uses.
- Extension variants: different configurations of your extension (verbose vs. concise responses, different tool descriptions).
Each additional profile multiplies your eval runs, but that’s not the real cost. The real cost is debugging: when something fails in a profile with 10 extensions installed, which extension caused the problem? Was it yours, someone else’s, or the interaction between them? The more variables you introduce, the harder it is to isolate what went wrong and what to fix. This is why starting with just baseline and extension matters: you get a clean comparison with one variable. Once you understand your extension’s impact in isolation, you have a solid base to compare against when you add complexity.
The four things you’re measuring
The first article introduced discovery, selection, quality, and composition. Each one fails differently, and each one is measurable.
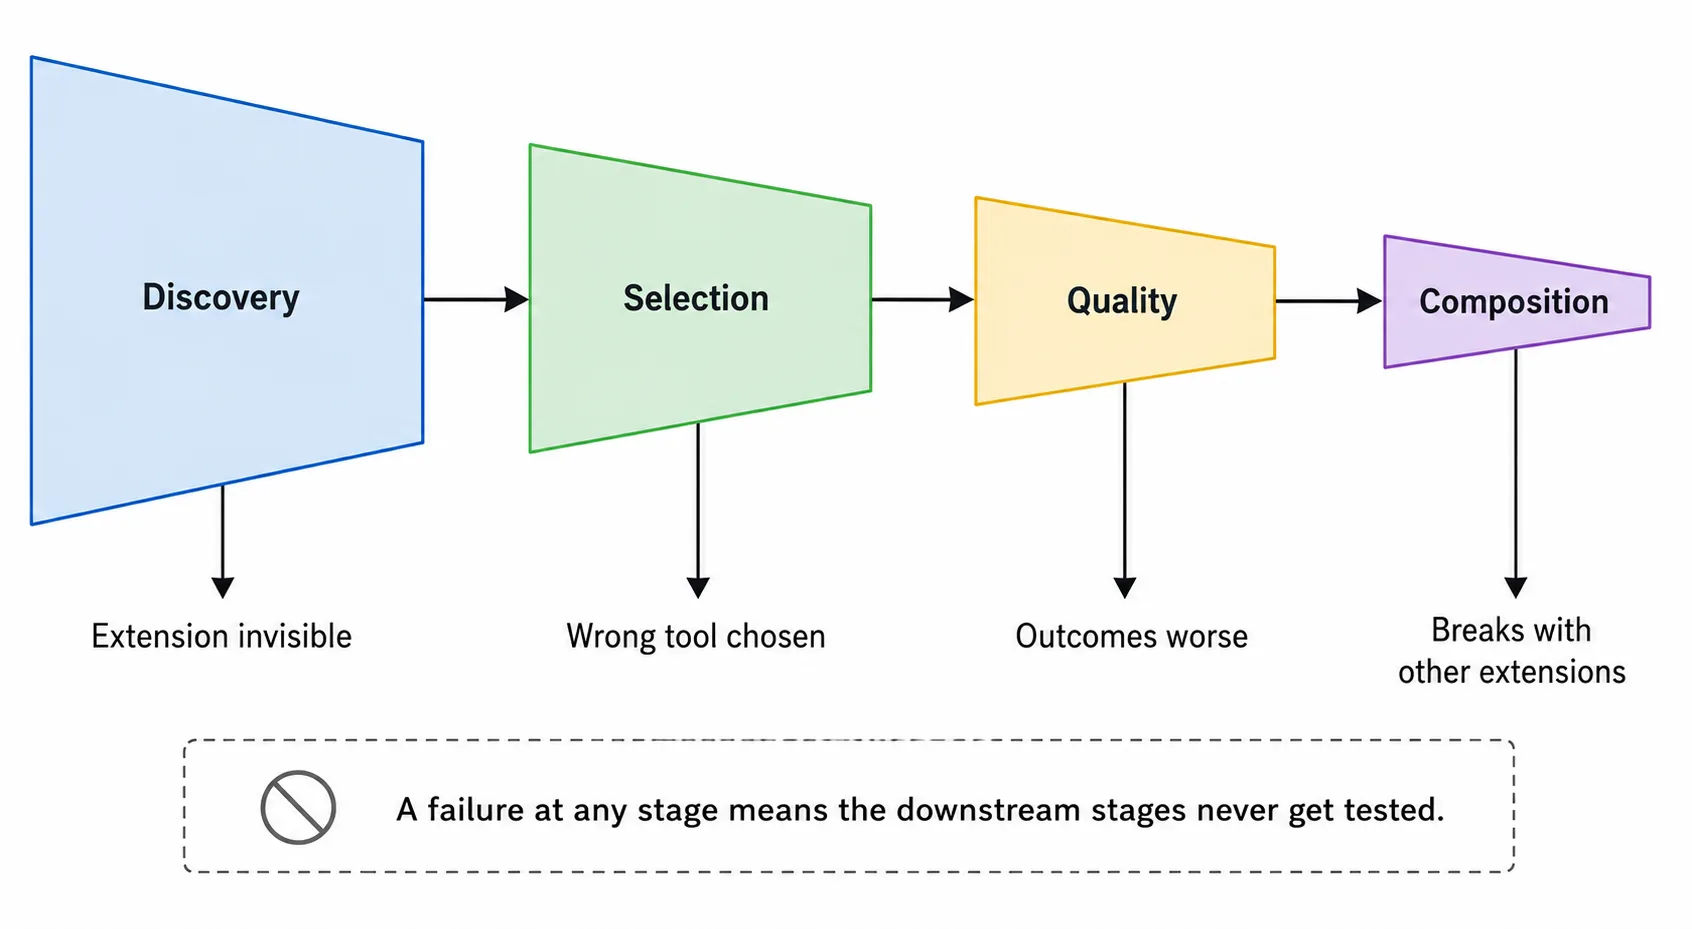
Discovery
From the outside, a discovery failure looks identical to a selection failure: the tool doesn’t get called. The difference is why. Some harnesses expose which tools were loaded into a session. If yours does, check there first. If it doesn’t, test with only your extension installed. If the agent still doesn’t call it, your tool descriptions might be too long (getting truncated by the harness), improperly registered, or exceeding the harness’s length limit. Fix discovery first, because everything downstream depends on it.
Selection
Look at scenarios where the developer’s prompt clearly relates to your technology, but the agent picks a different tool or none at all. Test with only your extension installed: if the agent still doesn’t pick your tool for a clearly relevant task, the description doesn’t match how developers think about the problem. Fix the description, test again, measure the change. Selection fixes are often the highest–ROI changes you can make: a single description rewrite can shift selection rates by double digits.
If your tool gets selected fine in isolation but loses to another tool when both are present, that’s a composition–, not selection–problem.
Quality
Compare evaluation scores with and without your extension. If scores improve, you’re producing lift. If scores stay flat, the extension is being called but not helping: the model already knew the answer, or your content didn’t add anything useful. If scores drop, you’re producing drag: the content confused the model, conflicted with its training data, or consumed tokens that would have been better spent on workspace context. Without the specific, measurable criteria we talked about earlier, you can’t tell whether the output is better or worse, only whether it’s different.
Composition
Run the same scenarios with your extension alone and then alongside popular tools from your ecosystem. If outcomes degrade, you have a composition problem. Isolate the cause by adding extensions one at a time: does the degradation come from a specific extension, or does it scale with the total number of tools competing for the context window?
The cost dimension
Lift isn’t free. Your extension adds tokens to the context window, and every tool invocation costs compute. A scenario that completes in 3 turns without your extension might take 7 with it. If outcomes improve by 10% but token costs triple, that’s still lift, just an expensive one. Whether it’s worth the cost depends on what the improvement buys you: a 10% improvement on a trivial task probably isn’t worth 3x the tokens, but a 10% improvement on a complex task where getting it wrong means hours of debugging might be worth 10x.
The cost metric that matters is token usage: total tokens consumed per scenario run (prompt + completion). Compare it across profiles the same way you compare quality scores. Significant lift at modest token cost? Good. Modest lift at double or triple the tokens? Optimize what your extension returns. Drag at any token cost? Rethink.
Common measurement mistakes
If you’re new to measuring AX impact, it’s easy to make mistakes that produce false signals. Here are the most common ones we’ve seen:
Checking presence instead of usage
The easiest criteria to write are presence checks: does the output mention your SDK? Does the code reference your API? But mention isn’t usage. A code comment like // TODO: Add Contoso Identity integration passes a presence check while doing the opposite of integrating. Check for correct usage, not just mention.
Skipping build verification
Static analysis (checking syntax, structure, imports) can produce high scores that collapse when you actually build and run the project. We’ve seen evaluations where static checks showed 90%+ pass rates, but the projects didn’t compile. Build-and-run verification is the minimum bar for any evaluation that claims to measure real-world quality.
Testing with optimized prompts
If you tune the developer prompt to mention your tool by name or use the exact vocabulary from your tool description, you’re measuring best-case–, not real-world selection. Use prompts that sound like what developers actually type. Don’t assume they speak your internal vocabulary.
Testing in empty workspaces
Agents behave differently in empty folders than in real projects. An empty workspace means no existing code to consider, no configuration files to read, no dependencies to account for. Your extension might perform well in a clean environment and fall apart in a project with 200 files and 15 existing dependencies.
Measuring a single run
LLMs are non-deterministic. The same prompt, same model, same configuration can produce different results across runs, so a single run tells you almost nothing. Run each scenario multiple times (5-10 minimum) and look at the distribution. If your extension lifts outcomes 8 out of 10 times, that’s a clear improvement. 3 out of 10 is inconclusive to say the least.
Ignoring the baseline
The baseline tells you what kind of extension you need to build. If the model already generates correct code for your technology 90% of the time, you need a lightweight extension that covers the remaining edge cases. If it gets things right 50% of the time, you need an extension that corrects misconceptions and fills knowledge gaps. If the model has never seen your technology at all, you need an extension that teaches it from scratch: what the API looks like, what the conventions are, how things fit together. These are fundamentally different extensions with different designs, different content, and different cost profiles. You can’t know which one to build without measuring the baseline first. Also, different models have different baselines so be sure to understand where your users are!
Evaluating on the wrong platform
If your developers use VS Code on Windows, but your evaluations run on a CLI-based agent on Linux, you’re measuring a different experience. The harness, the OS, and the available tooling all influence agent behavior. So to get reliable signals, you need to evaluate in an environment that matches your users’.
Getting started
You don’t need a full eval infrastructure to start measuring. Here’s the minimum viable approach:
- Pick 3-5 scenarios that represent the most common tasks developers use your technology for. Start with tasks where you suspect the model struggles without help.
- Write specific evaluation criteria for each scenario. What does correct output look like? What are the common failure modes?
- Run each scenario 5 times with and without your extension. Same model, same harness, same prompt.
- Score the outputs against your criteria. Start with manual scoring if you don’t have automated eval tooling yet.
- Compare. Is your extension producing lift, drag, or noise?
This gives you a baseline understanding of your extension’s impact. From there, you can add more scenarios, automate scoring, and introduce composition testing as you scale.
Summary
Shipping an agent extension without measuring its impact is guessing. You might be shipping lift, you might be shipping drag, and the only way to tell is to compare outcomes with and without your extension, keeping everything else the same. Measure discovery, selection, quality, and composition separately, because each one fails differently and each one has a different fix. And don’t forget cost: lift that triples your token budget might not be worth it. In the next article, we’ll look at what happens when multiple extensions are present at the same time, and why more extensions don’t mean better outcomes.
0 comments
Be the first to start the discussion.